Tired of dealing with “File size exceeded” limitations? Are you struggling to find an easy way to reduce PDF size of your files in order to quickly share important documents with your colleagues or others?
With Soda PDF’s easy-to-use PDF Compressor tool, you can easily compress your files into optimal sizes for an increase in shareability.
Best of all, when you create a new Soda PDF account, you’ll get instant access to our entire suite of powerful PDF tools & services, allowing you to compress files to your heart’s content.
Table of Contents
- What is file compression, anyways?
- How To Compress PDFs Using Soda PDF Desktop.
- Soda PDF makes all of your document goals entirely manageable.
What is file compression, anyways?
Compressing your file is a means of reducing the bits, the 1’s & 0’s of data, within your files. Remember the opening credits to The Matrix? Yup, those are the bits in a nutshell, or rather, a vertical scroll.
The bits within your file are then reduced or, more specifically, compressed, into a smaller file size which allows you to then share your file more easily.
Often the case with most file compressions, the quality of your document might be affected due to the reduction in bits. In other words, by reducing the bits, your file quality might suffer to a certain extent. For example, the image quality contained within your compressed file might look blurred.
With Soda PDF’s easy-to-use Compress tool, you can compress your file size without affecting the quality of your work, depending on the file compression you choose. Meaning you can then send or share your file without having to deal with the annoying “File size exceeded” limitation.
Ready to start compressing your file? Without further ado, here’s how to easily reduce PDF file size of any file using Soda PDF:
STEP 1: Go to our Compress PDF Online Tool
Looking to compress your file in just a few clicks? Try our Compress PDF Online Tool!
Here’s how it works:
- Click CHOOSE FILE
- Upload or drag-and-drop the file you wish to compress
- Select your file compression quality (Standard, High)

- Let Soda PDF’s Compress PDF tool take care of the rest!
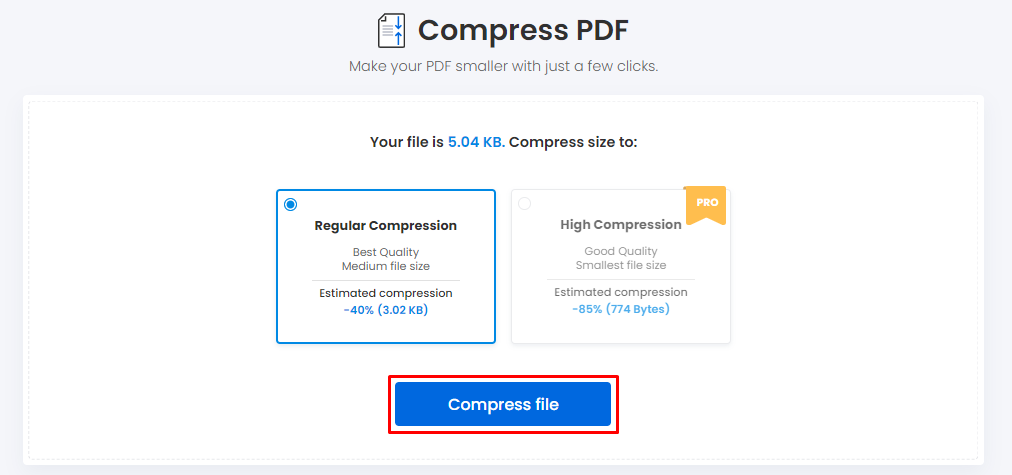
STEP 2: Choose Your Compression Quality
Having trouble selecting the quality? Here’s a quick explanation of each option:
Select Standard Quality if you’re looking to maintain most of your file’s quality with the minimal compression done, or rather without many bits being compressed.
Choose High Quality if you have some high-quality images such as important presentation visuals or graphic art within a portfolio that needs to maintain the highest quality possible.
Ready to start your file compression? Click on the COMPRESS PDF FILES to start the process!
STEP 3: Download Your File
Once you’ve clicked COMPRESS FILE, our PDF Compressor Online Tool will immediately begin to compress your file to the quality you’ve chosen.
You’re now able to download your compressed document! Simply click on DOWNLOAD FILE to have your compressed document automatically downloaded. Or select PREVIEW FILE instead if you wish to review the document before downloading it.
Need to make a few more modifications to your document once it’s been compressed? No problem! Simply click on the other easy-to-use PDF tools you see in the top toolbar and enjoy using Soda PDF for all your document needs!
Edit, convert, merge, split, draw or even highlight directly on your newly compressed document!
Be sure to log in using your newly created Soda PDF account in order to enjoy full access to these additional tools.
Looking for even more powerful PDF tools? You might want to download our fully featured PDF software instead.
How To Compress PDFs Using Soda PDF Desktop
If you’re looking for more than just a simple Compress PDF tool, you’ll want to try our complete PDF software version, Soda PDF Desktop.
Best of all, your newly created Soda PDF account works across our entire ecosystem, meaning that you can use your login to access our fully featured PDF software and our one-click Online Tools solutions.
Once you’ve downloaded Soda PDF Desktop and logged into your account, here’s how to get started with your file compression:
STEP 1: Upload or Drag-and-Drop Your File
Need to compress a Word file, or perhaps your PowerPoint presentation? No problem!
Simply drag and drop the document you wish to compress from your desktop or a file folder or click on Open PDF from the main menu of the Soda PDF application.
By opening any of these Microsoft Office files or even an image file within Soda PDF Desktop, you’ll be automatically converting these files into PDFs.
NOTE: If you’re specifically tasked with sharing an MS Office file or image, you can convert from PDF back to any file format of your choosing. For more information on our file PDF conversion tool, click here.
Once your file has been uploaded into Soda PDF Desktop, simply click on the CONVERT feature in the toolbar at the top of the application:
STEP 2: Select the Compress Tool
From the Convert feature, you’ll see a few tools to use. In this case, we’re not looking to create, convert, merge, or split our document, instead click on the Compress tool.
The following screen will appear:
Much like we saw with the Compress PDF Online Tool, you can now select the compression quality you wish to apply to this document.
As you can see, the Soda PDF Desktop application provides you with even more compression options:

Largest Size
- Use this option if you wish to compress your file to the maximum, meaning reducing the file to the lowest bits possible:
Large Size
- Choose this option if you wish to compress your file to a smaller size and don’t mind if attachments within your document aren’t saved in order to increase shareability.
Medium Size
- Select this option if you wish for your file compression to be the standard file compression used. We recommend Medium since your file quality will remain and won’t be as affected as if you chose High or Max.
Small Size
- Select this option to ensure you have lossless compression and that no images will be resampled or altered by compression.
Smallest Size
- Select this option if you wish for your file to be compressed to the minimal amount possible.
Furthermore, whichever compression quality you choose, you will be able to see the new file size before the compression even begins.
STEP 3: Click on COMPRESS
Once you’ve selected your file compression quality, click on the COMPRESS button to the right of the compression quality options.
The following window will appear:
Choose a new file name for your newly compressed document. Your newly saved compressed file will open in a new tab:
From there, you can use our other powerful PDF tools to continue to modify this newly compressed document to your specific needs.
Looking to easily manage your documents and streamline your workflows? Use Soda PDF for all your document needs!
Soda PDF makes all of your document goals entirely manageable
Looking to edit, create, convert, merge, split, secure or perhaps E-Sign PDF documents?
Well, with Soda PDF Desktop, you can accomplish all of your file-related tasks and accomplish your document goals in just a few clicks!
Soda PDF’s fully featured PDF software is available via our Desktop application or can even be accessed from any device with a web browser via our Online application.
Whether you choose Desktop or Online, your documents will be in good hands. Create your FREE Soda PDF account and get access to our entire suite of powerful PDF tools & services for one week!